
Eight Causes of Damp on Internal Walls
Damp is a common problem in properties across the country. If left untreated, damp on internal walls can cause serious problems to your home.
There are three major types of damp that you could find inside your property: rising damp, penetrating damp and condensation. All three have varying causes and treatments, but knowing the underlying problems that can lead to them will help you keep damp out of your home in the long term.
So, what are the most common causes of damp on internal walls?
1. Your Damp Proof Course Is Broken
Modern homes have a damp proof course (or DPC), which is designed to keep water from rising up from the ground and getting into the walls of your home. A damp proof course can be made of plastic, but more modern (and effective) DPCs are chemical substances injected into the walls.
A damp proof course is there to stop rising damp from affecting your home. Rising damp occurs when water from outside gets into the walls and begins moving upwards. This occurs if your damp proof course is broken. Rising damp can cause serious structural problems if it begins to affect large areas of your property.
2. Your Home Has No Damp Proof Course
Modern houses are fitted with damp proof coursing as standard, as it’s the most effective barrier against rising damp. However, older houses (houses which are a hundred years old or more) were never fitted with damp proofing and may never have been upgraded to include it.
If you have an old home, it’s good practice to investigate whether there’s a damp proof course or not. If not, you should consider fitting one for long-term damp proofing.
3. Faulty Structures
For damp to occur, there needs to be a source of water or moisture. Often, this water accidentally seeps into your home and begins affecting internal walls when it leaks through faulty building structures (what we call penetrating damp).
If there are broken tiles on your roof, cracks in the walls, broken windows, doors, or any other number of faults with the structure of your home, then penetrating damp can occur when water begins to get through.
4. Leaking Pipes and Faulty Plumbing
One major cause of damp inside your home is leaking pipes, usually due to faulty plumbing. While you’ll notice a major leak quickly, the worst culprits are the small leaks that often go unnoticed for some time.
These small leaks build up over time and cause damp in walls and timbers. This weakens the walls, damages the plastering and, in severe cases, could even cause collapse.
5. Broken or Overloaded Gutters
Your outside guttering can also cause major damp problems if it’s not in working order. Gutters are there to channel rainwater away from the walls of your home, but if they’re blocked or broken, water builds up and can’t be dispersed.
Instead of being channelled away, rainwater seeps into the roof or walls, or pools on the floor and seeps in through the groundwork. Broken gutters need to be fixed, and kept clear of debris throughout the year.
6. Lack of Ventilation
One of the most basic causes of damp on internal walls is a lack of ventilation. If there’s a build-up of moisture in the air inside, this causes condensation (particularly in winter).
Condensation is a mild form of damp, but it still causes problems if left untreated. You can fix the lack of ventilation by leaving windows open after hot showers or by setting up a dehumidifier.
7. Cold Spots Lead to Condensation
Cold spots in your home can cause condensation and resulting damp problems. These cold spots cause condensation when hot air hits them.
While some cold spots can be removed through proper ventilation, serious cold spots are caused by cracks or gaps in the walls that let in cold air from outside.
8. Cement Rendering Causes Cracks
Cracks are a major source of moisture inside the home, which can lead to penetrating damp or condensation.
In modern homes, one of the biggest offenders is the cement rendering on your walls. This common building material tends to crack over time, leaving you with gaps and cavities that let water seep inside.
Danford Brewer & Ives has been providing damp proofing and prevention services to homeowners in Yorkshire, Teesside and North East England for decades. We’re happy to provide further information on the possible causes of damp in your home and explain how our team can fix it.
Please contact our friendly team on 01765 804050 or fill in our online contact form. Our technical team will be on hand with expert advice tailored to resolve your problem.
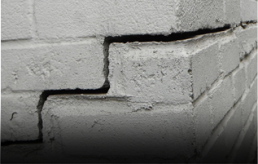
What Is Cavity Wall Tie Failure?
Cavity wall ties are the unseen ties that hold the walls of your home together. These metal rods, or strips, are an essential feature of your home’s structure. There isn’t a building standing that doesn’t need cavity wall ties for support!
But while cavity wall ties might be the last things on your mind, cavity wall tie failure is an increasingly common problem in UK homes. And broken or damaged cavity wall ties can lead to disastrous structural consequences for your house.
We asked our experts to explain what cavity wall tie failure is and how you can spot it.
What Are Cavity Wall Ties?
Cavity wall ties are simple metal rods or strips that play a surprisingly important role in the structure of your home.
Your home has two layers of the wall: an inner and an outer wall. The space in between is the wall cavity, which is essential for insulation. For support, these two layers are held together using cavity wall ties, which connect through the space between the walls.
Cavity wall ties are made from different materials, but the most common are metals or metal alloys, with zinc and steel being popular choices. If these cavity wall ties fail, the structure of the wall becomes compromised.
What Is Cavity Wall Tie Failure?
Cavity wall tie failure occurs when the worst-case scenario happens, and the cavity wall ties holding the two layers together collapse and fail.
The main reason for this failure is prolonged corrosion. Because they’re primarily produced from metal, the cavity wall ties are susceptible to rusting and corrosion when water gets into the cavity or seeps into the walls.
Cavity wall ties are coated in a protective, anti-corrosive layer before being installed, but this doesn’t last forever.
Unfortunately, it’s a natural process that can only be slowed down, not eliminated. Heavy rainfall, flooding, or leaks can all speed the process up.
Other reasons for failure include bad building work, loose brickwork, or loose mortar, which all affect the stability of the wall and can loosen the cavity wall ties. Because they’re supports, the builders may not have calculated the required number of cavity wall ties for the load, leading to extra pressure and stress, and eventually failure.
What Happens When Cavity Wall Ties Fail?
Cavity wall tie failure can have serious effects on your home. Because they’re required for structural stability, failed wall ties can lead to the outright collapse of an outer wall if they aren’t replaced.
While this is rare, it does happen and it generally occurs when multiple wall ties fail simultaneously or when the problem is ignored by the homeowner.
While wall collapses are rare, cavity wall tie failure can also lead to cracks in the masonry, damaged brickwork and problems with other parts of the house, such as the roof, when walls begin to shift or buckle.
Cracks or broken brickwork can lead to problems with ventilation, causing knock-on effects that lead to excess condensation. Water can seep in through the walls, which not only causes more corrosion and more wall ties to fail, but can cause damp or mould internally.
All of these problems not only cost time and money to repair, but are hazardous to human health and a danger to the occupants.
How Can I Spot Cavity Wall Tie Failure?
Cavity wall tie failure can have disastrous consequences in the long term, so it’s important to spot problems early and act fast to replace broken ties where necessary.
Because cavity wall ties are hidden away between the inner and outer walls, it can be difficult to spot these signs. For this reason, if you suspect you might be experiencing cavity wall tie failure, it’s good practice to call in a professional for an assessment.
If you notice any of the following problems or signs, then it’s time to request a survey:
● Horizontal cracks in the mortar or bricks if cavity wall ties expand due to rusting.
● Walls start to bulge outwards if cavity wall ties have broken due to prolonged corrosion.
● Broken window ledges or frames.
● Collapse (the most serious sign).
How We Can Help
If you think your cavity wall ties are failing, contact the team at Danford, Brewer & Ives for more information. We offer a cavity wall tie replacement service that can save your home from long-term damage.
Please contact our friendly team on 01765 804050 or fill in our online contact form. Our technical team will be on hand with expert advice tailored to resolve your problem.
How to Treat Woodworm
Woodworm can be a nightmare for homeowners, particularly if you don’t notice the problem until they’ve bored their way right through your timbers!
If left untreated, woodworm infestations can lead to disastrous structural damage and expensive repairs, but there are ways to identify and treat woodworm before it gets to this stage.
We asked our experts at Danford, Brewer & Ives to explain the best ways to identify and fight an infestation. From identifying woodworm boreholes to surveying your timbers, here are our top ten tips for treating woodworm.
1. Woodworm Are the Larvae of Beetles
Our surveyors commonly find that homeowners don’t know what woodworm look like, or even what they actually are. It’s a common problem, but there’s no shame in not knowing what woodworm are.
The confusion starts with the name, because woodworm aren’t actually worms. Woodworm aren’t even insects, at least not fully grown ones. Woodworm are the larvae of a beetle. Different species of beetle lay eggs, and these eggs hatch into larvae, which then burrow their way into timbers and wood in search of shelter and sustenance. The woodworm hatch into fully-fledged beetles later in their lifecycle.
Understanding what woodworm are helps us to understand where they live and what we need to look for. If you find lots of beetles in your property, then you’ve probably got woodworm.
2. Woodworm Love Timbers
Although they aren’t actually worms, woodworm are found in timbers (so at least one part of the name is correct!). Beetles lay their eggs on the outside of wood or timber, and the larvae burrow their way into those timbers.
Woodworm are searching for food as they burrow and they find this in the form of cellulose, which is present in timbers. In particular, woodworm prefer damp timbers, as damp timber is much easier for them to bore through in comparison to solid timber.
If you’re hunting woodworm in your home, you should start by searching for damp or mouldy timbers on your property.
3. Woodworms Live for Years
Woodworm have a surprisingly long lifespan, and they can spend as many as five years digging holes through your timbers before they hatch into fully-fledged beetles.
It’s important to know that woodworm can be a long-term problem, so you’ll need long-term preventative practices in place to keep them out of your timbers.
This long lifespan makes identifying the source of the infestation difficult, as those boreholes you see in timbers could have been sat there for years before you noticed them. By this point, the woodworm will have moved on to fresh locations.
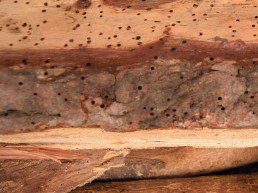
4. Round Holes Aren’t Always the Best Sign to Look For
The most common method for identifying a woodworm infestation is locating boreholes. These round holes are made by woodworm as they enter and exit timbers, and burrow their way deeper inside. While these round holes are a giveaway that woodworm have been in your home, they don’t necessarily indicate that there’s an active infestation.
Because of their long life span, these holes could be years old. The infestation could have passed or disappeared, or it could be larger than ever. Regardless, if you notice rounded boreholes, then you need to act as if there is an infestation. You might need an expert to help you find the real source of the woodworm though.
5. Look for Fresh ‘Frass’
One of the most important signs to look for is the presence of fresh ‘frass’ in your home. Frass is the unusual sounding name given to the droppings left behind by woodworm. So if you locate frass, you know your infestation is active and it’s nearby.
Locating frass by your rounded boreholes is an even bigger giveaway. But what does frass look like? It’s not exactly like normal droppings, but rather it’s composed of wood that’s leftover or been digested by the woodworm. This means that frass looks almost like sawdust, except it’s much thinner and finer.
Frass can form around the boreholes, but it can also drop down and pile up on the edge of skirting boards, underneath your wooden furniture, and in many other locations. If you notice an abundance of a fine, powder-like substance, then you could have a problem.
6. Woodworm Season Is April to September
Woodworm have a long lifecycle, but when it’s time for them to hatch into beetles, they’ll generally do this between April and September. This is woodworm season, and it’s when woodworm specialists are at their busiest, because this is when it’s easiest to locate and destroy infestations.
Woodworm start moving around and burrowing as they prepare to emerge from the timbers, and you’ll also start to notice more and more adult beetles appearing in your home. If you have an infestation, it will make itself apparent in some shape or form during woodworm season, but just remember the woodworm will still be there all year round if you don’t apply an effective woodworm treatment.
7. Establish the Extent of the Infestation
You can’t treat woodworm unless you know how far it’s spread, and that can be a tricky task for the inexperienced. Because they can live for years, woodworm have the potential to burrow deep into your timbers. They’re also likely to be hidden out of sight, especially if it’s taken you a long time to notice their presence.
It’s good to check parts of your home where timber are present, but that are hidden out of sight. This includes basement areas, floorboards covered by rugs or carpet, and attics and lofts.
If you notice woodworm signs in these locations, the problem could be deeper and older than you realise.
8. Act Fast if You Have a Woodworm Infestation
If you see any signs that woodworm might be burrowing their way through your timbers, you should act fast to identify the source and apply an effective woodworm treatment.
If left untreated, woodworm can cause serious long-term damage to your property. In fact, they might already have been digging through your timbers for several years before they revealed themselves to you.
Woodworm eventually eats through timbers, and this can cause important strongpoints in your home to be damaged and weakened. In severe cases, walls can fall down or the building could collapse, posing a danger not just to the home, but to anyone living inside.
Don’t ignore the tell-tale signs of woodworm; act fast and you can stop the infestation before serious damage occurs.
9. Call in Professionals if You’re Unsure
It can be difficult finding the source of a woodworm infestation or even discovering whether those rounded holes in the timber mean you’ve got an active infestation. Woodworm is not one distinct species either, there are many different types of woodworm and they might require different treatments to remove.
While you can apply your own treatment to the surface of affected timbers, you might not remove the threat at its source. There may also be hidden timbers infested with woodworm in places you never knew to look.
For these reasons, it’s always advisable to call in a woodworm professional if you notice any signs of woodworm in your home. They can conduct a thorough survey, identify the source and species of woodworm present, and start treating woodworm.
10. Prevention Is Always Preferable to Treatment
While woodworm treatment is an effective way to remove an existing infestation, it’s always preferable to prevent the occurrence of woodworm in the first place.
If left to their own devices, woodworm can cause serious long-term damage. If you need to begin treating woodworm infestations in your home, you could find that parts of your property are in need of repair once the woodworm have been removed. This can be not only time-consuming but expensive too, especially if structurally important parts of your home have been affected.
If you can prevent woodworm from becoming a problem, then you won’t need woodworm treatment and you won’t need to make repairs. A damp and timber survey carried out by professionals can help identify areas that could be susceptible to woodworm, as well as providing recommendations to help keep woodworm out in the long term.
Some prevention tactics are simple, including lowering humidity levels in your home and keeping rooms well ventilated to avoid creating the damp conditions that woodworm love.
Contact Danford Brewer & Ives for Woodworm Treatment
If you have a woodworm infestation, our woodworm treatment specialists can help. Danford, Brewer & Ives has years of experience dealing with woodworm. We can provide detailed surveys, identify woodworm, and apply effective prevention and woodworm treatment.
For more information and advice on treating woodworm infestations and the damage they can cause, please contact our friendly team on 01765 804050 or fill in our online contact form. Our technical team will be on hand with expert advice tailored to resolve your problem.